If you aspire to do your own bike maintenance, chances are you've tried to true your own wheels, or you want to learn how. Maybe you've tried, but weren't satisfied with the results. Either way, you may have been told that truing is one of the trickiest repair jobs a mechanic must learn, or that the wheel is one of the Great Mysteries upon which even the Master must meditate.
Despite the mystique, plenty of riders learn to true their own wheels by following a simple set of guidelines:
- Be patient
- Inspect the wheel first
- Pay attention to spoke tension
- Start with small corrections, and check your work
- Make corrections to either radial, or lateral, but not both at the same time.
- Be patient
- Be patient
Automatic wheel truing machines work by following a simple algorithm: find the worst spot, adjust the spokes nearby, then find the next worst spot. You can follow that same rule and you'll be successful most of the time. But with a little knowledge of the mechanics at play, you might just do a little better.
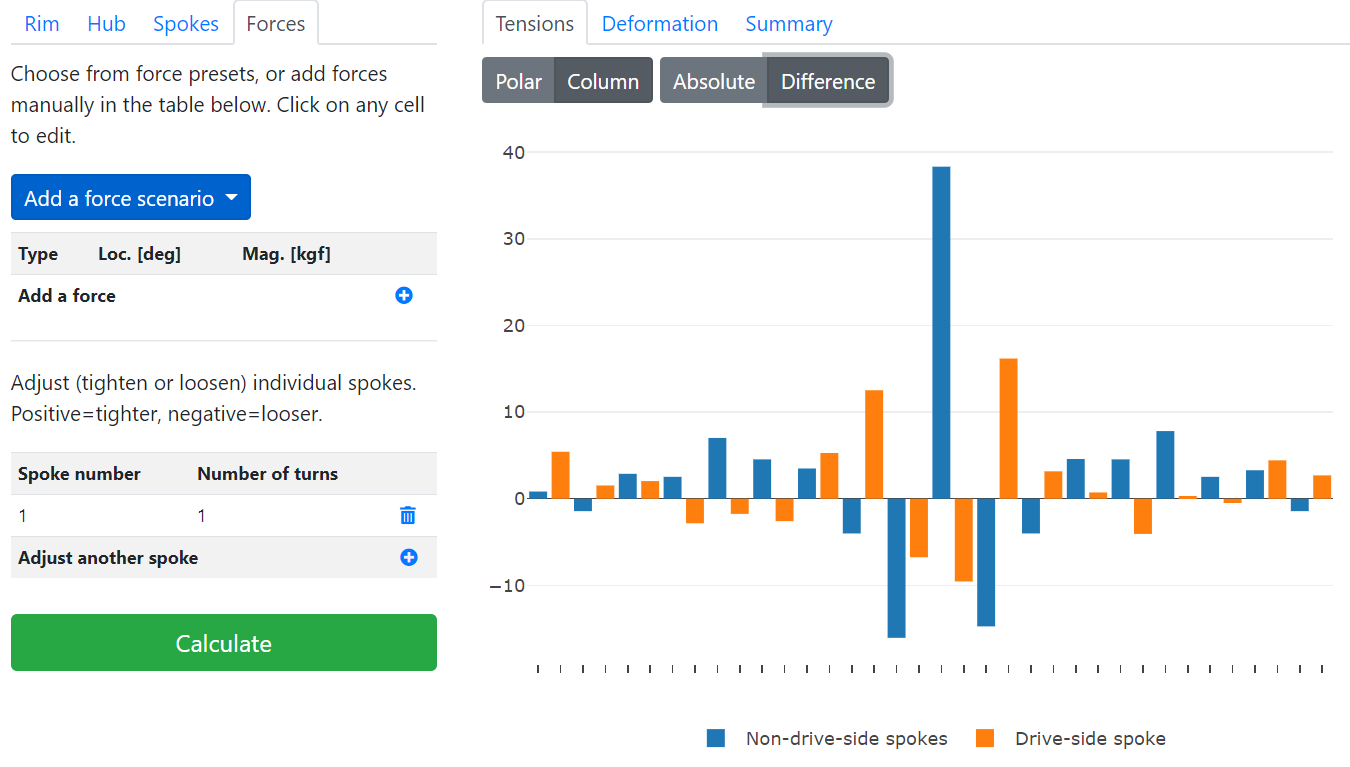
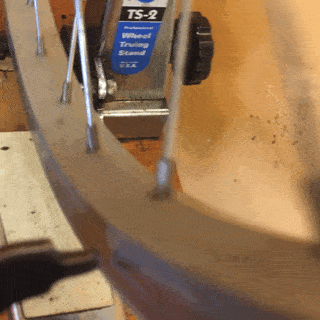
Using the Wheel App to simulate wheel truing
The Wheel App can show you what happens when you adjust spokes. After you've designed your wheel, click on the Forces tab, delete everything in the forces table, and add spoke adjustments in the adjustments table below. Spoke number 1 is the bottom-most spoke in the polar plot, or the center spoke in the column plot.
What happens when you adjust a spoke?
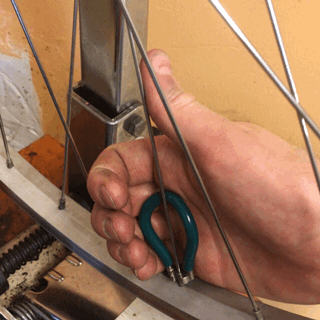
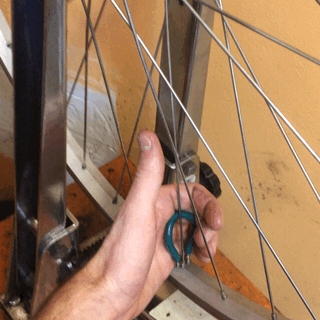
The spoke is held in the rim by the spoke nipple, which is threaded onto the end of the spoke. When you tighten a spoke, you are really moving the nipple towards the hub, pulling the rim along with it.
Pro-tip: Never forget which direction to turn to tighten the spoke: if you want tight, think right: Give a thumbs-up with your right hand and point your thumb along the spoke towards the hub. Follow your fingers to tighten the spoke. If you want loose, think left: point your left thumb along the spoke towards the hub and follow your fingers to loosen the spoke. This is always easier than trying to think of the nipple as a nut, and remember which direction to turn to "tighten" it towards the hub.
Two things happen to the spoke when you adjust the nipple: (1) the unstressed length of the spoke changes (the length the spoke would be if the ends weren't held by the hub and rim), and (2) the rim deforms under the additional tension. The change in spoke tension is a function of both effects:
\(\Delta T = K_s(\delta - u \sin{\alpha} - v \cos{\alpha})\)
\(\delta = 0.454 N\) is the change in unstressed length in millimeters, where \(N\) is the number of turns of the nipple (for a standard 56 thread-per-inch spoke thread), \(u\) and \(v\) are the lateral displacement and radial displacement of the spoke nipple, respectively, and \(\alpha\) is the lateral bracing angle of the spoke which depends on the hub width. \(K_s\) is the stiffness of the spoke (higher for larger and shorter spokes).
What does this equation tell us? Shortening the unstressed length tightens the spoke (the \(\delta\) term), but the rim moves towards the spoke you adjusted, which loosens the spoke. The change in tension would be greater in a wheel with a stiff rim than in a wheel with a flexible rim. Even though the inward radial displacement \(v\) is generally much smaller than the lateral displacement \(u\), the radial displacement has a larger effect on the tension because \(\alpha\) is usually rather small (and therefore \(\cos{\alpha} > \sin{\alpha})\).
To summarize:
- When you turn a spoke nipple in the tightening direction, the spoke gets shorter and tighter.
- The stiffer the spoke, the greater the change in spoke tension.
- The stiffer the rim, the lesser the change in spoke tension.
What happens to the rim?
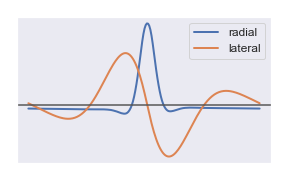
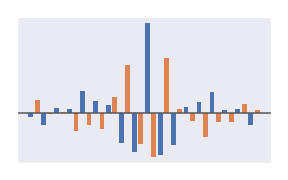
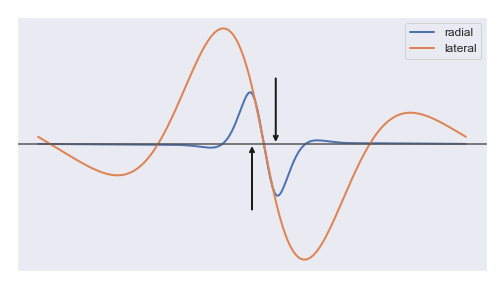
When you tighten a single spoke, the rim deforms in the same way as if you had applied a force in the direction of the spoke: inwards and slightly towards that spoke's hub flange. The rim is pulled inwards, and towards the side of the spoke you tightened. This creates a lateral "wave" and a radial "bump" near the spoke.
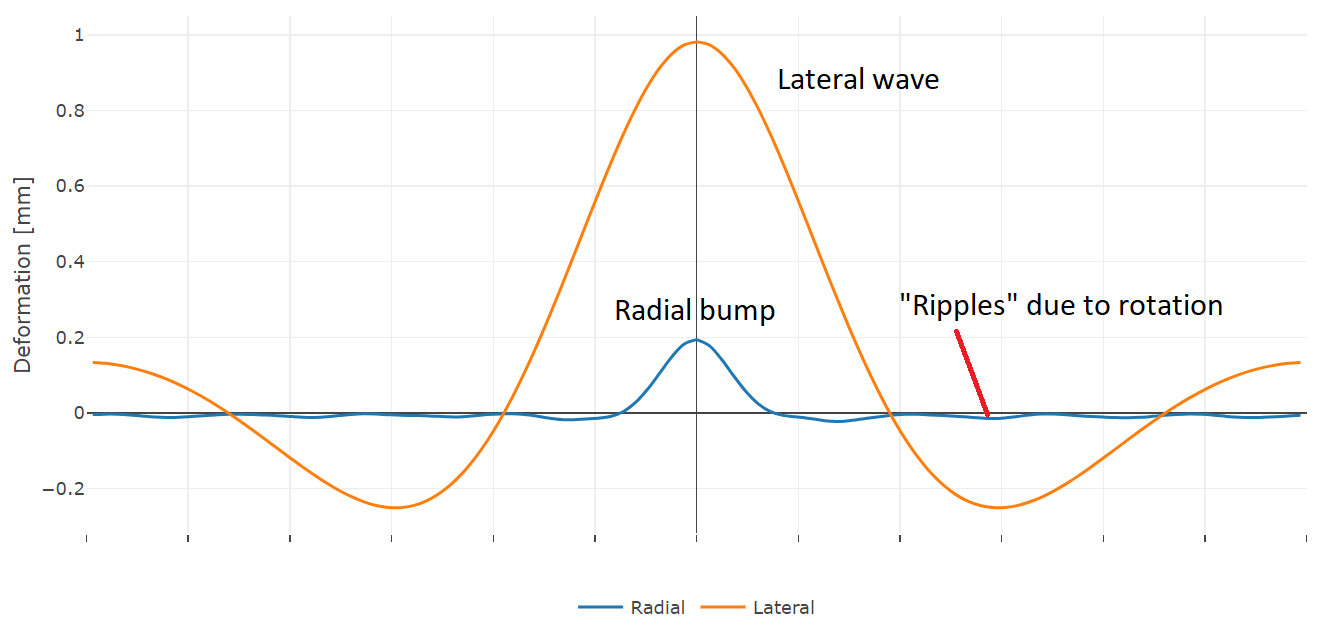
The radial bump is confined to a very small area, perhaps only 1-3 spokes wide. The lateral wave, on the other hand, extends over a wide arc, on the order of 8-12 spokes on a 36-spoke wheel. The stiffer the rim, the wider the arc. Even further away from the main wave, the rim bends in the opposite direction as the tightened spoke, like a lopsided spinning potato chip.
If the spokes are "crossed," (as they are in almost all wheels) the adjustment also causes the rim to rotate in the direction of the tightened spoke. Tightening a pulling spoke rotates the rim clockwise when viewed from the drive side.
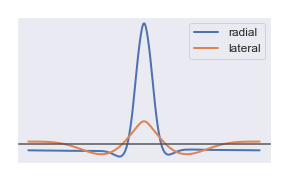
What happens to the other spokes?
Only the two spokes directly adjacent to the adjusted spoke feel the effect of the radial bump. These spokes get shorter and therefore lose tension.
Further away from the bump, the lateral wave causes the spokes on the same as the wave to loosen and the spokes on the opposite side of the wave to loosen.
The rotation of the rim causes other pulling spokes to loosen and pushing spokes to tighten, which in turn pulls the rim inwards and outwards, creating a small rippling effect around the rim.
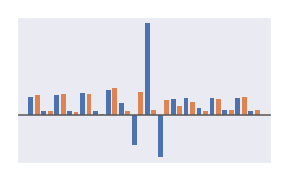
All of these effects (including the shortening of the adjusted spoke) add up to the picture below. Keep this principle in mind whenever you are building or truing a wheel: generally speaking, tightening a spoke loosens the first and second-nearest spokes, generally tightens the third-nearest, and the effect decays beyond that distance. The exact influence of course depends on the number of spokes, the rim stiffness, and the hub geometry, but this general rule is applicable to a wide range of rims.
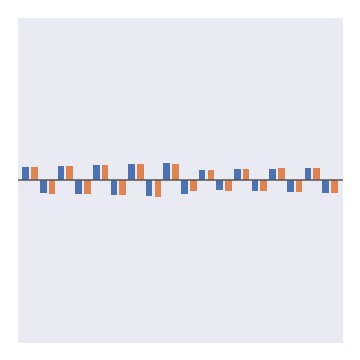
Radial effect
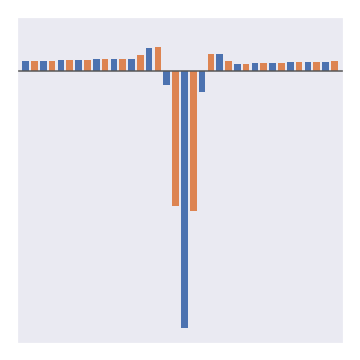
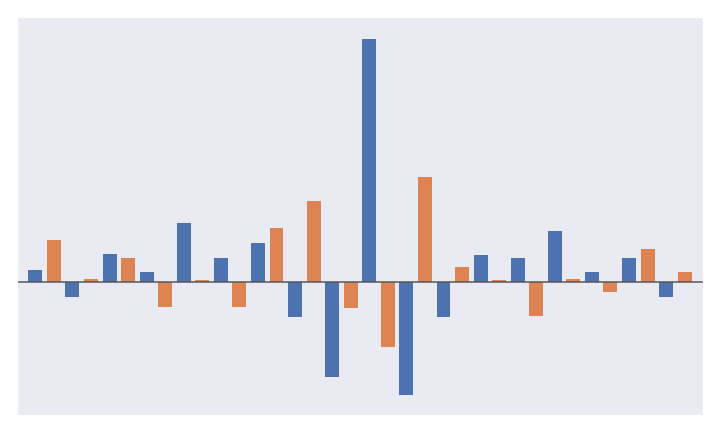
Lateral effect

Rotation effect
Total effect on spoke tensions
Common adjustments
One of the difficulties in truing a wheel is that every correction seems to create a new problem. Many a beginner has spent an hour trying to straighten a wheel only to find it in worse shape than when they started. To avoid headaches, mechanics follow a simple guideline: adjust spokes in groups such that only the desired degree of freedom (radial or lateral) is affected.
Radial adjustment
Radial truing is more difficult, and less-often necessary, than lateral truing. However, if you need to correct a radial error, you should generally work with a group of two or three spokes, depending on exactly where the error is.
If the bump occurs between two spokes, tighten the two spokes immediately adjacent the error by the same amount. This will pull the rim inwards. It will also create a small lateral wave to either side of the adjusted spokes, but this error is smaller than the radial change and can usually be corrected in subsequent lateral truing.

If the bump occurs at a single spoke, tighten that spoke, and tighten the two spokes immediately adjacent by half this amount. This will pull the rim inwards symmetrically. The tightening on the left and right sides will roughly cancel out (note: only on symmetric wheels).
Lateral adjustment
It is generally best to finish with a round of lateral truing, since the relatively large adjustments required for radial truing can cause lateral errors despite one's best efforts. The rim is much more flexible in the lateral direction, so it's possible to make large corrections without affecting the radial direction. However, one should still take care to make independent adjustments.
Generally, a lateral adjustment should be made with a group of three spokes, tightening (or loosening) the spoke in the middle by about 1/2 a turn, and making the opposite adjustment to the two adjacent spokes by about a 1/4 turn. This type of adjustment also minimizes the tension increase of the center spoke by "letting out slack" from the other side of the wheel.
Adjacent tight and loose spokes on same side
Machine-built wheels are trued by an iterative "hunt-and-peck" method, essentially applying the corrections above in a rote algorithm. To my knowledge, most automatic truing machines don't measure spoke tensions, so it's possible for large deviations in tension to "hide" from the machine because the wheel is balanced by large corrections at nearby spokes.
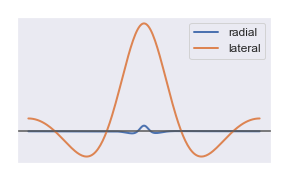
One issue I have come across in my experience is a large difference in tension between two adjacent spokes on the same side of the wheel: one tighter than average and one looser than average. Let's look at what happens when you tighten and loosen two adjacent spokes on the same side:
This type of error essentially produces a twisting motion around a point in between the spokes. The neighboring spokes pull the rim back to center, but the tendency of the rim to remain straight produces a large wave on either side of the offending spokes. A truing machine, unaware of the real underlying problem, will try to correct this by tightening and loosening the spokes near the peak of each wave, producing even more non-uniform spoke tensions.
When you are truing your own wheel (or touching up a machine-built wheel), pluck every spoke on a single side to look for errors like this and correct accordingly. You will still need to do lateral truing after correcting these, but hopefully your headaches will be minimized.
Automatic truing
Automated machinery has taken over many of the steps of wheelbuilding including "filling" the hub with spokes, lacing the spokes into the rim (assisted by a dexterous human operator), pre-bending and tensioning the spokes, and of course truing the wheel. Initial tensioning machines generally work by tightening the spokes to a roughly uniform tension (with the rim and hub rigidly clamped in place). The spoke tension can be estimated either by the torque required to drive the spoke nipple, or the resonant frequency of the spoke.
To my knowledge, modern automatic truing machines follow a "hunt-and-peck" algorithm, wherein the machine spins the wheel to find the worst wobbles and makes corrections at the peak of each wobble iteratively until the wheel is within spec. Every wheel responds slightly differently to the same spoke adjustment, so the machine parameters have to be tuned so that it is not so aggressive as to over-correct errors, and not so timid as to require dozens of adjustments. Even on the best machines, this process doesn't measure or try to control spoke tensions.
In theory, an intelligent machine could be designed which measures the current state of the wheel (lateral wobble, radial wobble, and spoke tensions), and makes corrections in a single pass to simultaneously minimize both geometric and tension errors. This machine would need a model (and an inverse model) which predicts the changes in spoke tensions and rim shape resulting from a spoke adjustment (and vice-versa). Jim Papadopoulos and his co-inventors showed how such a model can be easily measured by performing only a few experiments on a given wheel and described how the model can be used. The Bicycle Wheel Simulator generates this model directly from mechanics theory.
To my knowledge, such a "smart truing machine" has never been designed or tested. Perhaps the cost and complexity of overcoming the remaining challenges in measurement and repeatability are not worth the benefits of reaching a market already satisfied by the work of expert artisans. This is one of the reasons why, despite increasing automation of the bike industry, hand-built wheels are still the best your money can buy.